Monthly Archives: October 2011

Ghostly Meringues

Do you believe in ghosts? Even if you don’t, I hope you believe in these adorable little ghostly meringues. They aren’t as scary as your horror story ghost—they fall more into the same category as Casper. They’re friendly ghosts. And they taste just as sweet as they look. They have a light vanilla flavor, and a delicate, crisp, crunch.

They’re a great Halloween treat for adults, children, and pets. I say pets only because I left a plate of them on my dining room table, came back a few hours later, and every single one of they was cracked. My cat was the culprit. It definitely looked like he enjoyed them.

Also, as you can see from my pictures, I did not have black frosting to color on the ghosts’ eyes. I went to the supermarket 3 times telling myself to buy a little tube of black frosting, and forgot every single time. When I got home, I didn’t even have a black marker to fake all you readers out….I only had a magenta marker. My advice: Washable marker is edible in small amounts. If it’s all you have at home, use it! No one is going to die from two little dots of washable marker. It isn’t toxic. You’ll live. Just be careful when drawing on the meringues, because they are very fragile, and if you press too hard you will poke holes through the meringues!

Anyway, HAPPY HALLOWEEN EVERYONE!!! I hope everyone had a freaky Halloweekend, and that no one thinks they’re too cool for trick-or-treating tonight–because NO ONE is too cool for trick-or-treating.

2 egg whites, at room temperature                                                                                               2 teaspoons vanilla extract                                                                                                                1/2 teaspoon cream of tartar                                                                                                            3/4 cup superfine (caster) granulated sugar                                                                              dash of salt

Directions:

1. Preheat oven to 400 degrees Farenheit; beat room temperature egg whites, vanilla, salt, and cream of tartar on medium speed until visible peaks form.           2. Add sugar in small increments until completely dissolved and stiff peaks form, approximately 10 minutes.                                                                                                                3. Put mix into plastic bag, cut corner off, and form evenly sized dollops (approximately 2 inches in diameter) on a cookie sheet; use pastry bag instead of plastic bag if you have one.                                                                                                                4. Place meringues in preheated oven and immediately turn over off; leave to set for at least two hours or overnight; DO NOT open oven any sooner than two hours.                                                                                                                                                          5. Remove meringues from oven; use black frosting or marker to draw on eyes.      6. Serve at room temperature; keep up to one week.

And just remember: if a ghostly meringue shows up at your front door (as seen in the picture below), who are you going to call? GHOSTBUSTERS!


Mummified Shrimp

HAPPY HALLOWEEN EVERYBODY!!! In honor of the holiday and my freakishly long hiatus from SCGC, I will be posting two eerie Halloween recipes.

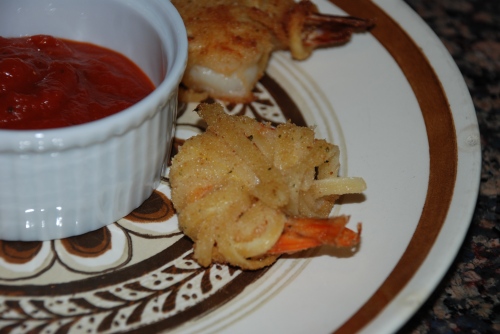
This first recipe is sure to be a hit at at Halloween parties you may be attending, and can easily still be appropriate as an appetizer at cocktail parties year round. This shrimp is rich in texture, and delicate–and ghastly–in appearance. It’s soft on the inside, crunchy on the outside. So good, and I can promise you won’t be able to just eat one.

One thing I cannot emphasize enough is to tuck the ends under other pieces of linguine as you go. No one wants to see a mummy come out of its wrapping, right? That’s way too scary of a sight, even on Halloween. Treat this shrimp no differently.

Also, I found really good, fresh jumbo shrimp at Whole Foods. If anyone is struggling to find shrimp (it is NOT in season in most parts of the country), I would definitely encourage you to look there. They do not sell it de-shelled and de-veined though, so you will have to do that yourself. It’s not as hard as it sounds, and if anyone would like me to post a demo to show how it’s done, please comment below or email me!

5-8 jumbo shrimp (shelled, deveined, cooked)                                                                          1/2 cup cooked linguine (approximately 1/4 lb. dried)                                                         2 eggs                                                                                                                                                           1/2 cup Italian style bread crumbs                                                                                                  Marinara sauce for dipping                                                                                                               Vegetable oil for frying

Directions:

1. Heat 1 inch of vegetable oil in a medium saucepan until piping hot; do not remove from heat.                                                                                                                                 2. Wrap linguine around shrimp, one strand at a time; tuck ends of strands under already wrapped linguine to prevent unraveling.                                                                     3. In a small bowl, whisk eggs briefly until yolks are broken; pour bread crumbs into a shallow bowl.                                                                                                                           4. Dredge linguine covered shrimp in egg, then immediately into bread crumbs; make sure entire shrimp is covered with both egg and bread crumbs.                           5. Place shrimp in hot vegetable oil; fry on each side for 4-6 minutes, or until each side is golden brown.                                                                                                                            6. Dry shrimp on paper towel; serve warm with marinara sauce for dipping.

ENJOY!

Grateful Granola Bars

A few weeks ago, I was sitting at my desk in my dorm room at school feeling really motivated. It was just an ordinary day, and I was thinking about what I was going to do over fall break, which is this week. I thought of fun things I could do like go into the city, go visit my cousins in Charleston, etc. Then, I started thinking of ways I could volunteer. In a fit of madness, I emailed probably every nonprofit organization in the tri-state area asking if I could make healthy snacks for their programs. I am a very strong advocate of cutting back obesity rates in America’s youth, promoting healthy food choices, and getting America active and physically fit. If I could I would make healthy meals for every child in the country who isn’t already served healthy meals at home, I SWEAR I would. However, that is simply impossible. I’m 19, a full time student, and working two jobs. I do not have the time, energy, or resources to do something like that. But a few days ago, while I was least expecting it, one of the organizations I had emailed weeks ago finally took me up on my offer, and asked if I was up for making 90 snacks for their program…in two days. A daunting, unrealistic task for most, but I’m always up for a challenge. I enlisted the help of my sisters, headed off to Sam’s Club to gather up supplies, and got cooking.

Yesterday, Wednesday, October 12th, I made 90 snack bags for the Boys and Girls Club of Trenton’s after school program, which is held after every school day at the Mott School. The snack bags all included a banana, a juice box, and a granola bar. The snack bags could have been mundane, just like the snacks I’m sure the kids get every other day, but I decided to make them special. So I made homemade granola bars. They were gluten free, lactose free, and low fat. They were both healthy and delicious. And to make them EXTRA special, I use a pumpkin shaped cookie cutter to cut out the granola bars.

Anyway, it’s always in the fall where people start thinking about giving back to the community. Usually around Thanksgiving. That being said, I am sort of going along with the crowd by doing something extraordinarily kind at this time of the year, but at the same time, I’m not. It’s not everyday that I’m willing to point out something really nice that I did, but I’m doing it now to set an example and inspire anyone reading this to go out and do good. Giving back is such a rewarding experience. Gather up your friends, raise a little money, make something special, and go out into the world and DO GOOD. Go to an animal shelter, a soup kitchen, a school for underprivileged children, or anywhere that needs a little help. Do it for the experience. Your good deeds may not make in onto the front page of the Trenton Times, but I can promise you God will be watching you the whole time and smiling. Doing good isn’t about the glitz and the glamour anyway. Take in the looks on the children’s faces when they open an ordinary brown bag, reach in, and take out a pumpkin shaped, homemade granola bar that you slaved over for five hours the night before. Let their thanks and gratefulness touch your heart. Go home, take a look around your world, look at all of the things you have…your family, your friends, your house….and just take 10 seconds to think about how lucky you are. If you are lucky enough to be sitting in front of a computer reading this, I think you are lucky enough, and have A LOT to be grateful for. Not everyone in the world is as fortunate as you and I are. Thank God for how blessed your life is, and then GO, GO, GO make a difference in someone else’s life. Help someone else feel even just half as lucky as you are. Help someone feel loved. Let them know that they matter, and they are important. If I can do it, you can do it.

(Makes 15-20 granola bars)

5.5 cups rolled oats (quick or old-fashioned)                                                                             1 cup pumpkin puree                                                                                                                             3/4 unsweetened applesauce                                                                                                           1 cup brown sugar (light or dark)                                                                                                     1 cup dried cranberries                                                                                                                       5 tsp vanilla extract                                                                                                                             4 tsp pumpkin pie spice

Directions:

1. Preheat oven to 350 degrees Farenheit; lightly grease a metal cookie sheet.         2. Mix all ingredients in a large bowl until well combined.                                                   3. Press mixture into cookie sheet, until granola mixture is half an inch thick uniformly throughout.                                                                                                                          4. Bake for 20 minutes; remove from oven immediately, cool for a few minutes, cut while still warm; keep for up to 3 weeks.

SCGC News!

Hey everybody,

Sorry for completely sucking on putting up new recipes lately. I am truly sorry. I’m not going to conjure up an excuse. Life happens. However, I do have some very exciting news:

1. Check out the new website address! SCGC can now be reached at skinnycollegegirlcooking.com! I’m still working with WordPress, but .wordpress. has been omitted from my web address. Exciting!

2. Skinny Snacks will be up and running TOMORROW. I hope you are all pumped to get some awesome ideas. It’s taken me FOREVER, but I’m finally ready to put it all up.

3. Also tomorrow I will be uploading a very special recipe called “Grateful Granola Bars.” Today I dropped off 90 snack bags to the Boys and Girls Club of Trenton after school program at the Mott School. The bags all included the granola bars I made. You can read all about my experience tomorrow when I put up the whole story. I hope you’ll be inspired.

4. As many of you know, at school I do NOT have access to a kitchen. All of my recipes were made over the summer/over school breaks when I have had access to my kitchen at home. I am currently on fall break, and have a TON of amazing new recipes to share, however, I’m worried that my recipes will run out before my next break. But do not fret….I always have a back up plan. I will be starting a new sector of SCGC. The new sector is going to be called “The Daily Dish.” The Daily Dish will be divided into: CollegeGirl Life, Love, Culture, Style, Entertaining, Holidays, and Crafts.  All of the articles will should be really interesting, and very pertinent to all of your fabulous CollegeGirl lifestyles. Get ready…the first Daily Dish post will be going up by Friday. I hope you all enjoy it!

Finally, I just want to thank everyone for the tremendous support of Skinny CollegeGirl Cooking. I’ve had more views to this site than I could have ever imagined. None of this could have been possible without SCGC’s fan base. I love you all, and want you all to know how wonderful I think each and every one of you are. If you haven’t already, please subscribe to SCGC, and drop me an email or comment on one of my posts. I always respond, and I love to hear from you all!

Stay skinny, stay hungry.

Kelly

Tuna Salad with Celery and Grapes

Tuna salad–on its own or in a sandwich–is a season-less classic. It can be enjoyed on the hottest day of the summer or during the biggest snowstorm of the year. Tuna is an excellent source of protein and omega-3 essential fatty acids. This recipe really brings out all of the flavor that tuna has to offer. Combined with the crunch of celery and the sweetness of grapes, this tuna salad turns something seemingly ordinary into something extraordinary. When I make this recipe, I choose to pair red/purple grapes with the green celery, for more interesting color contrast. I also prefer to serve this tuna salad on 100 calorie deli flats, just to keep the recipe extra skinny. Enjoy!

Ingredients:

1 can tuna                                                                                                                                                   dollop of miracle whip                                                                                                                         1/4 cup celery, finely chopped                                                                                                         1/4 cup grapes, quartered

1. Drain tuna well; combine all ingredients in a small bowl; mix with a fork.               2. Serve as is or on bread; refrigerate up to 5 days.